 shanhui notes
quantize edge llms to run on RK3588
so i am working on a LLM + hardware side project, a full stack voice AI assistant for my uncle’s takeout restaurant. the system is not an edge TTS stack connected to cloud inference API. no, we are running it all on the edge hardware (no need for internet connection), and part of the challenge is to fit “intelligent enough” models onto smaller chips like the RockChip 3588 and optimising the hell out of it so it can run TTS, AST, and the LLM, along with the Python web server and couple other daemon processes.
in this post, i want to write about a small, but critical step which is quantisizing an edge model like the Qwen1.8b, converting to .rkllm format, and having the edge model run on the rk3588 chipset since there is not much documentation on the interwebs about this and i believe that applying industry specific edge models and compressing intelligence will be become more important in 2026-2028.
what is the rk3588
rk3588 is a chipset designed by Rockchip 瑞芯微, a fabless semiconductor design firm based in Fuzhou, Fujian which also happens to be where i am from! the chip offers low powered, high performance for its size. equipped with 4-core ARM cortex-A55, embeded 3D GPU, integrated built-in 3-core NPU with computing power up to 6TOPS, RAM up to 32GBs, and many other data points that as a self taught hardware engineer, i do not fully understand, but you can read here https://rockchip.fr/RK3588%20datasheet%20V2.2.pdf. this chip is often used for demanding on premise edge machine learning tasks like image recognition. we will attempt to use it to run a full voice inferance stack at ultra low latencies and decent intelligence.
the important part is that each NPU core is CNA (convolutional neural-network accelerator) with: - 1024 MACs/cycle per core (3x1024 = 3072 total) - internal SRAM per core buffer for weights and activations - supports core linking, can be split for concurrency or joined for larger models
  Memory System

  ┌─────────────────────────────────────────────┐
  │             System DRAM (8-16 GB)           │
  │  ┌──────────┐ ┌──────────────┐              │
  │  │  CPU     │ │  NPU carve-  │              │
  │  │  memory  │ │  out (1-4GB) │              │
  │  └──────────┘ └──────────────┘              │
  │         Shared bus (~25 GB/s)               │
  └─────────────────────────────────────────────┘
and comparing with the less powerful rk3576
  ┌─────────────────────┬────────────┬─────────────────────────┐
  │                     │   RK3576   │         RK3588          │
  ├─────────────────────┼────────────┼─────────────────────────┤
  │ NPU cores           │ 2          │ 3                       │
  ├─────────────────────┼────────────┼─────────────────────────┤
  │ NPU TOPS            │ 6          │ 6                       │
  ├─────────────────────┼────────────┼─────────────────────────┤
  │ CPU big cores       │ 4×A72      │ 4×A76 (~30% faster IPC) │
  ├─────────────────────┼────────────┼─────────────────────────┤
  │ CPU little cores    │ 4×A53      │ 4×A55                   │
  ├─────────────────────┼────────────┼─────────────────────────┤
  │ RAM bandwidth       │ ~17 GB/s   │ ~25-30 GB/s             │
  ├─────────────────────┼────────────┼─────────────────────────┤
  │ RAM typical         │ 8 GB       │ 8-16 GB                 │
  ├─────────────────────┼────────────┼─────────────────────────┤
  │ Process             │ 8 nm       │ 8 nm                    │
  ├─────────────────────┼────────────┼─────────────────────────┤
  │ Max model that fits │ Qwen3-0.6B │ Qwen3-4B (16 GB board)  │
  └─────────────────────┴────────────┴─────────────────────────┘
i find a rk3588 dev board on Taobao for around $200 from Neardi Tech (Shanghai) which has lots of opensource resources on building products on Rockchip SoCs like the rk3588. here is the product datasheets: lch3576-som.pdf
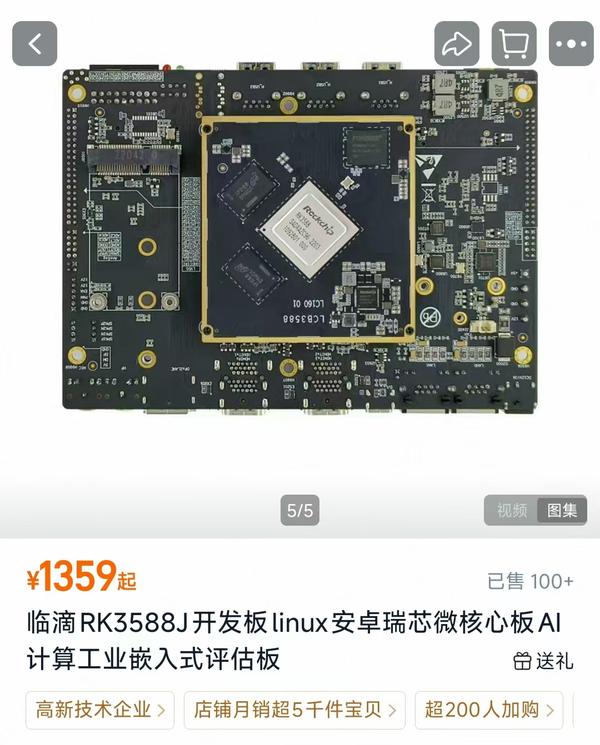
using the rkllm toolkit and preparing conversion scripts
the rkllm-toolkit is Rockchip’s Python package that runs on CUDA x86_64. it only runs on x86 PC, so no ARM chips like Apple laptops can do the conversion. the purpose of the toolkit is that it takes a HuggingFace weight model (FP16/FP32) parses the model graph, maps to NPU support ops, does the quantization with callibration (more on this later) and serializes to the .rkllm binary format. then you can copy the resulting weights to an RK device and load it onto the NPU.
ret = llm.build(
    do_quantization=True,         # False for FP16, True for W8A8/W4A16
    optimization_level=1,         # graph-level optimizations
    quantized_dtype="W8A8",       # or "W4A16", or "FP16"
    quantized_algorithm="normal", # "normal" for W8A8, "grq" for W4A16
    target_platform="RK3588",     # tunes op selection to the specific NPU
    num_npu_core=3,               # how many NPU cores the model expects
    extra_qparams=None,           # additional per-layer quantization params
    dataset="calib.json",         # the calibration data — CRITICAL
    hybrid_rate=0,                # 0 = pure NPU, >0 = spill some ops to CPU
    max_context=4096,             # max KV-cache length baked into the model
)
you can choose FP16 (16-bit float) if you want full precision, no quantisation. this is a direct graph compilition that converts to NPU ops. it does a few other things like fuse adjacent operations where NPU has fused kernals, allocate NPU memory buffers for weights and KV cache, and schedule computation across 3 NPUs.
W8A8 is the first real quantisation level. it stands for “weight 8-bit, activation 8-bit”. this is post training quantisation with calibration.
here is an detailed explaination of how PTQ works (explained by Deepseek v4 Pro):
Weight quantization (offline, during build):
  1. For each linear layer weight matrix, the toolkit computes the per-channel min/max range
  2. Weights are symmetrically quantized: w_int8 = round(w_fp16 / scale), where scale = max(|w|) / 127
  3. The scale factors are stored alongside the INT8 weights

Activation quantization (calibration-driven):
  1. The calibration dataset (our 121 ChatML examples) is run through the model
  2. For each layer, the toolkit records the distribution of activation values (the intermediate tensors between layers)
  3. It computes optimal quantization ranges — this is where most of the "intelligence" lies. The toolkit probably uses a combination of:
    - Min-max calibration: track the min/max of each activation tensor across all calibration samples
    - KL-divergence calibration: find the quantization range that minimizes KL divergence between the original FP16 distribution and the quantized INT8 distribution (this is standard practice in NVIDIA TensorRT and other inference optimizers)
    - Percentile clipping: clip extreme outliers (e.g., 99.99th percentile) to reduce quantization error for the bulk of values
we added a 121 calibration (LLM generated, human verified) examples for English, Spanish, and Mandarin Chinese restaurant phrases across food prep, kitchen operations, and general phrases for the calibration dataset so that the quantisizer sees a realistic distribution of activations. this calibration data should be domain specific for your product deployment use case.
with W8A8, we get about a ~2x size reduction from the original FP16 HF Qwen3.1.7B model or 2.4GB .rkllm file.
there are also more dramatic quantisations like 4WA16, which reduces the weights to 4-bits, but keeps the activation at 16-bit. for a less powerful chip like the rk3576, you might need to use this setting.
we use 4096 as the maximum KV-cache size which can not be changed via runtime. it is hard configured into the binary during the quantisation process. hybird_rate=0 controls the CPU/GPU split. setting to 0 keeps all layers on the NPU. since the rk3588 has 3 NPU, we set num_npu_core=3.
the exported .rkllm file contains the:
1. quantized weights - int8 or int4 tensors
2. NPU compute graph - the full model as a sequence of NPU operations
3. memory allocation plan - how to lay out weights, activations, and KV-cache in NPU SRAM and DDR
4. chat template - can be set at runtime with rkllm_set_chat_template()
5. scheduling plan
in general for sub-5B models, W8A8 is the sweet spot where the accuracy lost is minimal for ½ the size.
note on GRQ group residual quantisation
there is a more aggressive quantisation algorithm called GRQ which i targted at 4-bit by grouping weights into smaller clusters and quantises each group in isolation. think of it as creating a stack of cookbooks. see: https://drscotthawley.github.io/blog/posts/2023-06-12-RVQ.html
renting gpus on vastai
to do the actual work of converting to rkllm format and quantisation, i rented a cheap GPU from VastAI for -$0.50 per hour. the RTX4060s should be sufficient for this task. since VastAI is a marketplace, it took me a few tries to get a working GPU, so make you have the conversion scripts prepared on your local machine ready too rsync across to the GPU instance.
you can use this to estimate how much VRAM the GPU will need based on the model size
┌────────────┬──────────────┬────────────────────────┐
│ Model size │ Minimum VRAM │      Recommended       │
├────────────┼──────────────┼────────────────────────┤
│ 0.6B       │ 4 GB         │ 8 GB (any Vast.ai GPU) │
├────────────┼──────────────┼────────────────────────┤
│ 1.7B       │ 8 GB         │ 12 GB                  │
├────────────┼──────────────┼────────────────────────┤
│ 4B         │ 16 GB        │ 24 GB (RTX 3090/4090)  │
├────────────┼──────────────┼────────────────────────┤
│ 7B         │ 24 GB        │ 32 GB+                 │
└────────────┴──────────────┴────────────────────────┘
it helps to split up the task into 2 steps. the first step should be the preparation work, downloading the require dependecies, downloading the original models from HuggingFace, getting the RKLLM wheel, and setting up the Python env. the second script is for the actual conversion, it activates the env and runs the quantisation process. this way you can run the conversion from a checkpoint if things failed.
┌─────────────────────┐     ┌──────────────────────┐
│   setup_rkllm.sh    │     │   convert_model.sh   │
│   (run ONCE)        │ ──→ │   (run N times)      │
│                     │     │                      │
│ • system packages   │     │ • activate venv      │
│ • Python venv       │     │ • run build script   │
│ • RKLLM wheel       │     │ • print manifest     │
│ • all dependencies  │     │                      │
└─────────────────────┘     └──────────────────────┘
                                      │
                                      ▼
                            build_rkllm_model.py
                            (the actual conversion)
instead of using pip, i suggest using uv for much faster downloads.
one gotcha is that the rkllm wheel declares auto-gptq as a hard dependency, but this is not required. auto-gptq also fails to build from source in most of the GPU environments i tried, so th solution is to install the wheel without its dependency list uv pip install -q --no-deps "${WHEEL_URL}" and then install the explicit dependencies.
uv pip install -q \
  "setuptools<70" \
  numpy \
  transformers \
  torch==2.6.0 \
  ...  # ~30 packages total
running the conversion looks like this with the prepared scripts:
# 1.7B for RK3588 at W8A8
MODEL_ID="Qwen/Qwen3-1.7B" TARGET="RK3588" QUANT="W8A8" ./convert_model.sh

# 4B for RK3588 at W4A16 (memory-saving)
MODEL_ID="Qwen/Qwen3-4B" TARGET="RK3588" QUANT="W4A16" ./convert_model.sh

# Full custom run
MODEL_ID="Qwen/Qwen3-1.7B" \
  TARGET="RK3588" \
  QUANT="W8A8" \
  MAX_CONTEXT=8192 \
  DTYPE="bfloat16" \
  GPU_DEVICE="1" \
  ./convert_model.sh
the is another script build_rkllm_model.py that does the real work of converting to .rkllm binary
# downloads for HuggingFace
from huggingface_hub import snapshot_download
local_dir = snapshot_download(repo_id=args.model, ...)

# load calibration data
if not calib_path:
    data = _calibration_data(args.model)   # 121 built-in examples
    # write to /tmp/rkllm_calib.json

# loads model into RKLLM
llm = RKLLM()
ret = llm.load_huggingface(model=local_dir, device="cuda", dtype="float16")

# build with quantization
ret = llm.build(
    do_quantization=(q_upper != "FP16"),
    quantized_dtype=...,
    quantized_algorithm="grq" if W4A16 else "normal",
    target_platform=...,
    num_npu_core=3,
    dataset=calib_path,
    max_context=...,
)

# export the binary
ret = llm.export_rkllm(out)
the entire process should take less than an hour depending on the size of the original model and the level of quantisation you want. the larger the original model and the more aggressive the quantisation, the longer it takes.
if everything works, you should get a .rkllm optimised weight binary for less than $1 GPU rental fee.
model conversion end result
the end result is 2 files that we compressed via quantisation qwen3-0.6b_FP16 (1.5 GB) and `qwen3-1.7b_W8A8 (2.4 GB). later we will build a OpenAI compatible v1/chat/completions FastAPI C wrapper service that will run inferance on these quantisized weight files, and connect it to the rest of the edge voice stack. stay tuned!
overall i learned a lot about lower level hardware and how LLMs work at a hardware level from working on this project. for anyone interested in hardware and edge AI, i suggest doing this exercise yourself. however, you can also download both the conversion scripts used for the conversion and the resulting .rkllm binaries on HuggingFace zshanhui/qwen3-1-7b-w8a8-rk3588-rkllm.
in the a future post, i will do a write up about the rest of the TTS, AST, LLM and full edge voice system once i get the prototype wired up and working.